Text or Call


Text or Call

HILTON'S NEW NAVIGATION FEATURE EXPLAINED
 |
We have just launched our new, free navigation app "RT-Nav" on the iTunes app store where you can now save any image into your iPad or iPhone then Go Fish! All you need is a valid Hilton's username/password to access the app, but it is important to note that you cannot use the app until you populate it with your desired charts.
The app is free, but it is also empty, as it contains no charts when you download it off of the app store. Before you can use the app, you must first tell the system which charts that YOU are interested in bringing along with you to navigate upon. You can do this by clicking on the "Save Map" button located above the upper left corner of each Hilton's image inside the Hilton's website.
Once you have saved all of the desired images, they are cached on our server so that you can then download them into your device while still in cell/wifi range. The first time you open a region in the RT-Nav app on your iPhone/iPad, it will automatically go to your account and look for any saved charts for that region and then download them into your device. Once the download process has completed, you can then click the "Navigate" button (also while still in cell/wifi range). Once you go into navigation mode, you can shove off and go fish, as everything is self-contained in your iPhone or iPad and you no longer need to worry about being in cell/internet range. Your iPhone/iPad are now chartplotters, and the dynamic Hilton's charts are your navigation charts. Also, once in navigation mode, it will stay in navigation mode until you tell it to do otherwise.
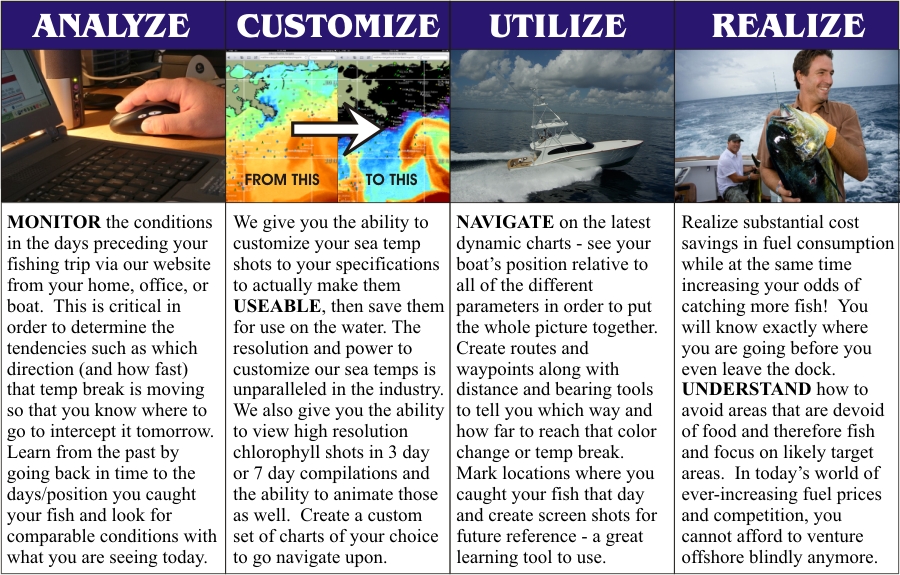
While in the website, you can customize your sea temp shots to your specifications using the Min/Max feature to filter the temp range and improve the quality of the image to pop out the frontal temp breaks. Once you have customized the sea temp shot to your specifications, you can the click "Save Map" to save it into your account. In addition to sea temp chart(s), it is a good idea to save 3d bottom chart(s), chlorophyll chart(s), surface current chart(s), and altimetry chart(s).
All saved images go into your Map Management List, which be viewed by clicking on the button just above the Smart Device Navigation icon named “Saved Map Man.” in the lower left nav bar of the website. This is where you manage your chart inventory to review your chart inventory and to remove any charts that are no longer pertinent to your upcoming trip.
When you have been using the app for a while, you will be adding and deleting charts as you go, so when you go to a region page in the app, you will need to click the "Refresh" button to update your chart inventory. It will go up to your account and delete old charts that you have instructed to be deleted, and add new charts that you have saved. Once this update process has completed, you then click "Navigate" and shove off to go fish.
Inside the RT-Nav app, everything will look just like the website except there is no left Nav Bar, and YOU are now one of the icons on the screen, and can see your current position on each image as you navigate, using satellite GPS technology. On the upper left corner (you may have to pinch the screen to zoom in enough to see it adequately), is your navigation data window (NDW). Your current lat/long position will be displayed, and the map window will show which map you are currently seeing as your background. If you click on the drop down list of charts saved into your unit, you will see all of the charts that you have saved to take with you - simply click on the desired chart name and that chart will come up as your background image. Click anywhere on the chart, such as a temp break or color change, and a window will pop up on that spot giving you the following options in addition to the lat/long position of that spot;
“Go To” - creates a route to that spot from your current position, and the navigation data screen will now show the distance and bearing (DTW/BTW) to show how far and which way.
“Create Waypoint” - creates a waypoint on that spot after you enter the description for that waypoint.
“Zoom In” - zooms in! This is an important feature to use sometimes, instead of simply pinching the screen to zoom, as using the zoom button zooms in and at the same time the text is made smaller. Sometimes the text can overpower the screen, and this is the mechanism to control the size of the text.
“Zoom Out” - zooms out! Same as above - sometimes the text is too small, so you can make it larger by zooming out.
“Cancel” - this is for times that you click the screen accidentally, and will remove the popup window.
Back to the navigation data window (NDW) - you will see a blue arrow on the upper left corner of the NDW. Sometimes, depending on your zoom level, the NDW gets in the way, so you can remove the NDW from the screen by clicking on the blue arrow. When you want to see the NDW again, simply click on the green arrow and it will reappear.
If you click “RENAME” in the NDW, it pulls up a popup window that allows you to name the icon that shows your current position. You can name it anything you want; your boat name, your name, your wife’s name, whatever, and you can change it as many times as you want.
On the waypoint management side, there is a drop-down window that you can click on to view all of the waypoints in that region. If you select a particular waypoint, it appears in the window, then click “View” if you want to see the lat/long coordinates - you cannot alter the default waypoints that Hilton’s provides, but you can view their information. If you have a particular waypoint selected in the waypoint window, then click “Go”, it will create a route to that particular waypoint.
If you select “Create Waypoint” in the window, then click the “New” button, a new window will come up where you can enter the name and lat/long position of that waypoint, then Click “Create” and that waypoint will show on the chart. You can also go into the waypoint management window and edit any custom waypoints. Note: you can also create waypoints on the fly by clicking on the image and then clicking “”Create Waypoint”.
If you have already clicked on the screen and selected “Go To” on a spot such as a temp break or color change, then there will be a route from your current position to that point. You can select the “Go To” point in the waypoint management window, as it is considered a waypoint in its own right, then click “Edit” to see the lat/long position of that point. This is important if you want to retrieve the lat/long information to input to your helm's chartplotter.
Another cool feature is your ability to click on the NAME of any waypoint to create an instantaneous route to that waypoint from your current position!
The concept here is to push the time envelope to where you can pull down the absolute latest imagery while on the dock readying your boat for your fishing trip. Once you have all the desired images saved while in the website, open the app and click "Refresh". Once the system is done refreshing your chart inventory, you can then click "Navigate". Once in navigation mode, you can then shove off the dock and go fish, as you no longer need to worry about staing in cell/wifi range - your are navigating using staellite-based GPS technology. Also, remember that you cannot access the website once out of cell range unless you have a satellite phone/wifi interface.
If you have any questions regarding this new feature, please don't hesitate to contact me.
All the best,
Capt. Thomas J. Hilton
CATCH MORE FISH USING LESS FUEL!
| Join Our Mailing List |